Rasbian image setup
The image used in this project is based on the rasbian stretch lite Version: November 2018.
Wifi functionality
For the purpose of this project we need to connect to a “parent” network and setup a “child” network. To achieve this we will need hostapd, dnsmasq, iptables-persistent and some configuration because we want to use the built in wifi as an client to a network (“parent” network) and an access point for a second network (“child” network) at the same time.
Setup
- /etc/network/interfaces.d/ap
To file /etc/network/interfaces.d/ap we add:
allow-hotplug uap0
auto uap0
iface uap0 inet static
address 10.3.141.1
netmask 255.255.255.0
/etc/network/interfaces file contains network interface configuration
information for the both Ubuntu and Debian Linux. This is where you configure
how your system is connected to the network.
- /etc/udev/rules.d/90-wireless.rules
In file /etc/udev/rules.d/90-wireless.rules
ACTION=="add", SUBSYSTEM=="ieee80211", KERNEL=="phy0", \
 RUN+="/sbin/iw phy %k interface add uap0 type __ap"
In a GNU/Linux system, while devices low level support is handled at the kernel level, the management of events related to them is managed in userspace by udev, and more precisely by the udevd daemon.
- /lib/dhcpcd/dhcpcd-hooks/10-wpa_supplicant
/lib/dhcpcd/dhcpcd-hooks/10-wpa_supplicant should look like this:
if [ -z "$wpa_supplicant_conf" ]; then
        for x in \
                /etc/wpa_supplicant/wpa_supplicant-"$interface".conf \
                /etc/wpa_supplicant/wpa_supplicant.conf \
                /etc/wpa_supplicant-"$interface".conf \
                /etc/wpa_supplicant.conf \
        ; do
                if [ -s "$x" ]; then
                        wpa_supplicant_conf="$x"
                        break
                fi
        done
fi
: ${wpa_supplicant_conf:=/etc/wpa_supplicant.conf}

if [ "$ifwireless" = "1" ] && \
    type wpa_supplicant >/dev/null 2>&1 && \
    type wpa_cli >/dev/null 2>&1
then
        if [ "$reason" = "IPV4LL" ]; then
                wpa_supplicant -B -iwlan0 -f/var/log/wpa_supplicant.log -c/etc/wpa_supplicant/wpa_supplicant.conf
        fi
fi
- Setting up the client to the “parent” network
We need to create /etc/wpa_supplicant/wpa_supplicant.conf and add the
networks credentials. Here more informations about more advaced informations can be found.
ctrl_interface=DIR=/var/run/wpa_supplicant GROUP=netdev
country=US

network={
    ssid="_ST_SSID_"
    psk="_ST_PASSWORD_"
    key_mgmt=WPA-PSK
}
Replace ST_SSID with the network SSID and ST_PASSWORD with wifi password.
- Install packages needed
apt-get update
apt-get install -y hostapd dnsmasq iptables-persistent
- /etc/dnsmasq.conf
interface=lo,uap0
no-dhcp-interface=lo,wlan0
bind-interfaces
server=8.8.8.8
dhcp-range=10.3.141.50,10.3.141.255,12h
- /etc/hostapd/hostapd.conf
Here we can set the credentials and characteristics of our access point.
interface=uap0
ssid=MD // ssid of access point
hw_mode=g
channel=6
macaddr_acl=0
auth_algs=1
ignore_broadcast_ssid=0
wpa=2
wpa_passphrase=ChangeMe // password of access point
wpa_key_mgmt=WPA-PSK
wpa_pairwise=TKIP
rsn_pairwise=CCMP
- /etc/default/hostapd
To this file we add:
DAEMON_CONF="/etc/hostapd/hostapd.conf"
- Bridge of ap and client side At this step we bridge ap and client side so that clients to our access point can access the internet.
echo "net.ipv4.ip_forward=1" >> /etc/sysctl.conf
echo 1 > /proc/sys/net/ipv4/ip_forward
iptables -t nat -A POSTROUTING -s 10.3.141.0/24 ! -d 10.3.141.0/24 -j MASQUERADE
iptables-save > /etc/iptables/rules.v4
Lastly the raspberry pi has to reboot.
for this wifi setup this guide was used.
Sensor data relaying
ENABLE I2C https://www.raspberrypi-spy.co.uk/2014/11/enabling-the-i2c-interface-on-the-raspberry-pi/
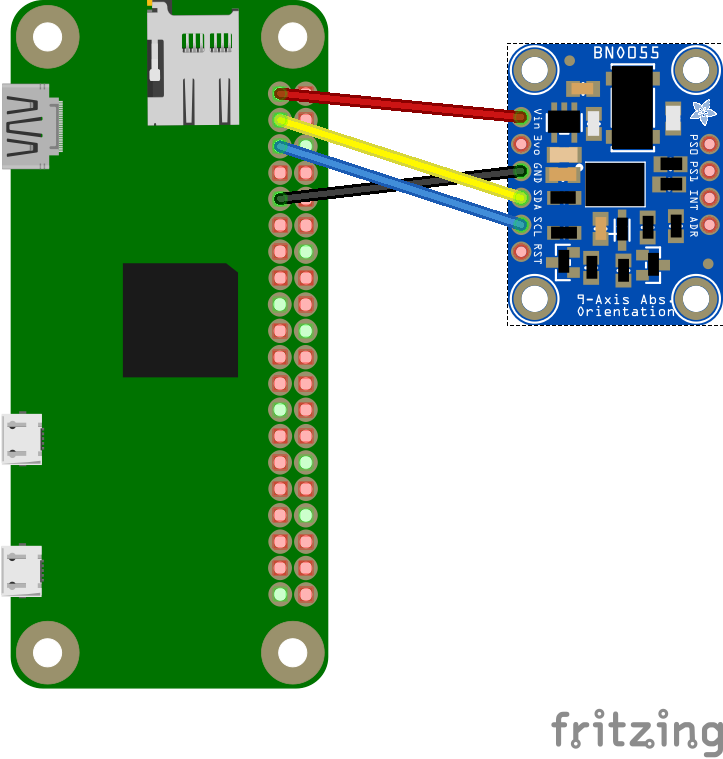
We use a bno055 absolute orientation sensor. The sensor can be connected to
the raspberry pi zero w like this:
To install the libraries needed to use the bno055 with a raspberry pi follow this guide.
We will also need to use the python library python-osc to send sensor data
over osc.
pip install python-osc // installs python-osc
// you may need to use the --user option
the python script for sending the sensor data is this:
import time
import board
import busio
import adafruit_bno055
import argparse
import random
from pythonosc import osc_message_builder
from pythonosc import udp_client
time.sleep(1)
i2c = busio.I2C(board.SCL, board.SDA)
sensor = adafruit_bno055.BNO055(i2c)

client = udp_client.SimpleUDPClient("10.3.141.100", 57120) // address sensor data is send to

while True:
     client.send_message("/accelerometer", sensor.accelerometer)
     time.sleep(0.0025) // the delay is placed inbetween the messages for better stability
     client.send_message("/magnetometer", sensor.magnetometer)
     time.sleep(0.0025)
     client.send_message("/gyroscope", sensor.gyroscope)
     time.sleep(0.0025)
     client.send_message("/temperature", sensor.temperature)
     time.sleep(0.0025)
Lastly the python script must start on boot. This is achieved by placing this:
sudo -H -u pi python3 /home/pi/magneticdance/bnoTest.py &
into /etc/rc.local just before exit 0.
Raspap webgui
For the webgui functionality we used Raspap-webgui. There is a quick install guide but this didn’t work, so we have to do a manual install.
To use the Magnetic Dance glove reference the Manual